本文介绍了Gradle在Android项目开发中的应用,包括配置SrouceSets、定义全局常量、组件化、定义Apk名称、App包名、依赖项配置等。
常见的项目用法#
查看依赖关系#
方式1:gradlew :app:dependencies > log.txt
时间会久一点,在根目录会输出一个log.txt,内容大致是这个样子,缩进表示依赖
1 | DebugAndroidTestCompileClasspath - Resolved configuration for compilation for variant: casarteDebugAndroidTest |
方式2:
- 依次选择 View > Tool Windows > Gradle(或点击工具窗口栏中的 Gradle 图标
 )。
)。 - 依次展开 AppName > Tasks > android,然后双击 androidDependencies
查看SourceSets#
- 依次选择 View > Tool Windows > Gradle(或点击工具窗口栏中的 Gradle 图标 )。
- 依次展开 AppName > Tasks > android,然后双击
sourceSets

可以看到打印的结果,除了main还包括其他变体
1 | main |
配置SourceSets#
配置文件路径#
语法:
配置项名.srcDirs = ['路径1','路径2'......]
配置项名.srcDirs '路径1','路径2'
问题:配置项都有哪些?可以点击链接查看这里项目概览 |Android 项目视图
问题:路径如何定义?相对路径还是绝对路径?相对于谁?
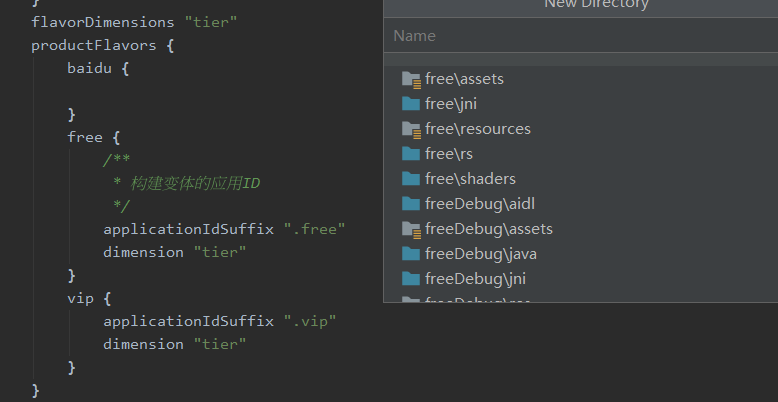
此路径都是相对于module/build.gralde位置的相对路径
假设有这么一个层级目录,
shop
-build.gradle
-src
–main/
—aidl/
—res/
—java/
-vip
–aidl/
–main/
—res/
—java/
如上文处于shop/build.gradle中的sourceSets部分,应该是这么写的
1 | manifest.srcFile 'src/main/module/AndroidManifest.xml' |
我们可以通过AppName > Tasks > android,然后双击 sourceSets,查看我们配置后的路径是否生效
比如我们修改了main的sourceSets
1 | main { |
查看命令行输出:
可以看到res、java、assets、aidl路径确实相比之前的默认路径增加了
1 | main |
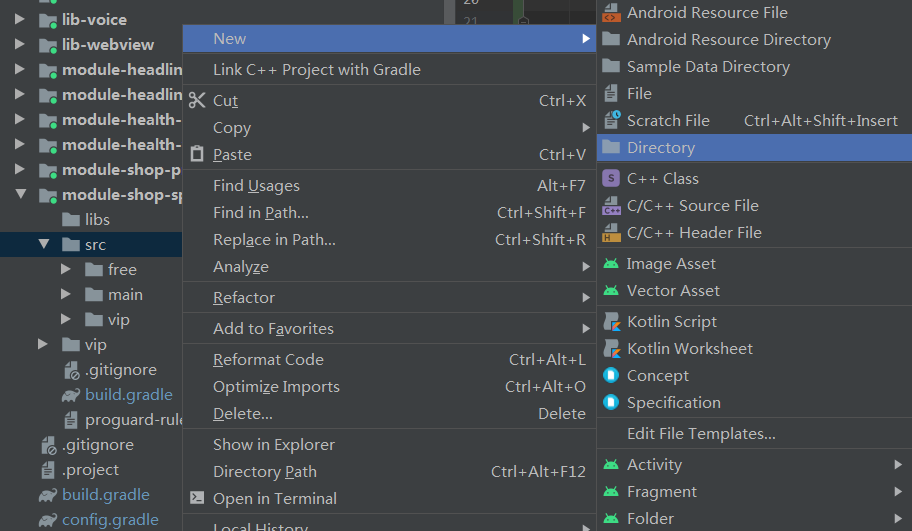
在变体分类下创建文件#
创建变体/Java目录
- 右键点击
src目录,然后依次选择 New > Directory。 - 从 Gradle Source Sets 下选择 变体名称/java。
- 按 Enter 键。
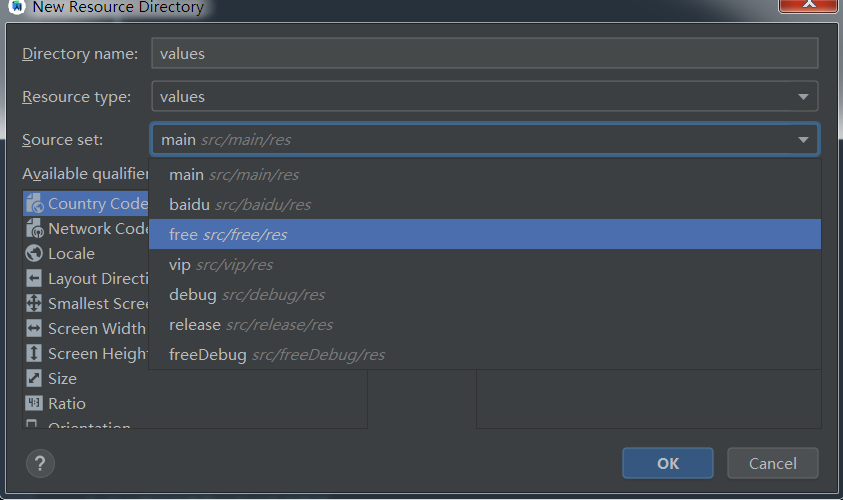
创建xml资源文件
- 右键点击
src目录,然后依次选择 New > XML > Values XML File。 - 输入 XML 文件的名称或保留默认名称。
- 从 Target Source Set 旁边的下拉菜单中,选择 debug。
- 点击 Finish。
进阶配置#
文档还提供了更详细的配置,针对于变体、build类型、产品变种各自的配置方式;并且定义了合并顺序,了解这一点对于合并不同的srouceSets很有帮助,尤其是当类名、资源名冲突的时候。
合并顺序是:build 变体 > build 类型 > 产品变种 > 主源代码集 > 库依赖项
定义常量#
常量用途#
定义全局依赖库的版本号、apk的调试配置、开发配置
常量示例#
Demo参考我的开源项目
编写文件#
在根工程下建立config.gralde文件
注意是必须以ext开头
1 | ext { |
该文件的末尾,定义了2个方法动态赋值versionName、versionCode
导入变量#
在根工程下的build.gradle下使用以下语法导入,这样做的效果是根工程下的任意一个library、module都可以访问
1 | apply from: "config.gradle" |
使用变量#
使用语法为rootProject.ext.变量名['key名']
1 | dependencies { |
定义组件化#
组件化用途#
组件化是非常典型的架构设计,它的优点有很多,不在此文一一列举了,下面只说实现方式
组件化示例#
Demo参考我的开源项目
定义变量#
在根工程下的gradle.properties文件内可以配置变量
1 | isComponent=true |
定义组件/build.gralde模板#
该模板提供以下功能
- 根据变量区分module、library,方便开发进行组件化调试、方便组件化打包apk,详见参考
android#sourceSets部分 - 统一设置了apk签名参数,详见参考
android#signingConfigs部分 - 支持自定义apk的参数,如为shop打包时候,自定义apk的名称前缀,方式是
rootProject.ext.apk['apkAlias'] = "shop_special_offer"和signingConfigs#outputFileName - 统一设置了apk的各种参数,如versionCode、versionName、Sdk版本等,详见参考
android#defaultConfig部分
1 | /** |
远程代码仓库#
常用的仓库地址#
1 | google() |
国内可能需要配置阿里云maven
| 仓库名称 | 阿里云仓库地址 | 源地址 |
|---|---|---|
| central | https://maven.aliyun.com/repository/central | https://repo1.maven.org/maven2/ |
| jcenter | https://maven.aliyun.com/repository/public | http://jcenter.bintray.com/ |
| public | https://maven.aliyun.com/repository/public | central仓和jcenter仓的聚合仓 |
| https://maven.aliyun.com/repository/google | https://maven.google.com/ | |
| gradle-plugin | https://maven.aliyun.com/repository/gradle-plugin | https://plugins.gradle.org/m2/ |
下载顺序说明#
代码库的列出顺序决定了Gradle在代码库中搜索各个项目依赖项的顺序,如果在google仓找到了A,那么Gradle只会在google中下载A依赖项
1 | allprojects { |
声明特定的地址#
语法为:仓库名{ url "地址"}
1 | allprojects { |
依赖指定位置的库#
本地library依赖#
语法为:implementation project(':库文件夹名称')
- 括号里单引号双引号都可以,注意加冒号
- 库文件夹名称,必须在settings.gradle中include
1 | implementation project(':mylibrary') |
本地jar二进制依赖#
语法为:先声明fileTree、匹配二进制依赖的正则
- 指向的位置是
module_name/dir,module是当前application目录,dir是开发传入的值 - 匹配规则是include传入的值
1 | implementation fileTree(dir: 'libs', include: ['*.jar']) |
远程jar二进制依赖#
语法为:implementation '命名空间组名称:依赖库名称:依赖库版本号@jar'
@jar可以简写
1 | implementation 'androidx.swiperefreshlayout:swiperefreshlayout:1.0.0:sources@jar' |
远程二进制依赖#
当使用此语法时,Gradle会根据参数寻找远程代码库
语法为:implementation group: 命名空间组名称,name:依赖库名称,version:依赖库版本号
1 | implementation group: 'com.example.android', name: 'app-magic', version: '12.3' |
简化的语法如下:
implementation '命名空间组名称:依赖库名称:依赖库版本号'
1 | implementation 'com.example.android:app-magic:12.3' |
本地aar二进制依赖#
本地aar依赖语法:
一种是implementation(),括号里面带上name和ext的键值对
一种是implementation files(),括号里带上aar的相对位置
1 | implementation fileTree(dir: 'libs', include: ['*.jar','*.aar']) |
用法:
第一步:module/build.gralde中加入flatDir对象,flatDir声明了libs目录相对于module模块位置
1 | repositories { |
第二步:fileTree配置过滤的正则,加上.aar
1 | compile fileTree(dir: 'libs', include: ['*.jar','*.aar']) |
第三步:引入aar
1 | compile(name: 'wheelview', ext: 'aar') |
远程aar依赖#
aar的远程依赖写法:
1 | implementation fileTree(dir: 'libs', include: ['*.jar','*.aar']) |
1 | android{ |
本地so依赖#
第一步:so文件放在module/libs目录下
第二步:将jniLibs.srcDirs的赋值为so文件位于module中的相对位置:libs
1 | sourceSets { |
依赖方式配置#
基础配置项#
| 配置项 | 解释 | 依赖传递 | 是否构建至编译类路径 | 是否构建至apk 运行时能使用 |
|---|---|---|---|---|
| implementation | 避免了依赖传递 | 否 | 是 | |
| api | 就是gradle插件3.0版本提供的compile | 是 | 是 | 是 |
| compile | 就是gradle插件2.0版本提供的api | 是 | 是 | 是 |
| apk | 否 | 是 | ||
| compile | 是 | 是 | 是 | |
| provided | 否 | 是 | 否 | |
| compileOnly | 是 | 否 | ||
| runtimeOnly | 否 | 是 |
还有其他的配置项可以参考文档添加构建依赖项 | Android 开发者 | Android Developers (google.cn)
排除依赖项#
语法:excluede group: '命名空间名称',module:'模块名称'
示例:
1 | dependencies { |
常见的依赖项错误#
重复错误#
错误提示: Program type already present com.example.MyClass
错误原因通常是下面2种情况之一:
宿主App依赖库A,库B;但库A已经依赖了库B
解决:取消宿主App对B的依赖
宿主App依赖库A(本地依赖)和库B(远程依赖),库A和库B是同一个依赖项
解决:宿主App移除任意一个的依赖