跨进程通信方案#
原生方案#
| 对比项管道Pipe | 管道Pipe | socket | AIDL | Messenger | MemoryFIle | signal | FileObserver | UrlScheme |
|---|---|---|---|---|---|---|---|---|
| wiki | Pipe PipedWriter PipedReader |
Socket ServerSocket |
匿名共享内存(Anonymous Shared Memory-Ashmem) | |||||
| 支持双向 | NO | YES | ||||||
| 支持本进程(多个线程)通信 | YES | YES | ||||||
| 支持启动者数量(类型) | 不限 | 不限 | Activity\Service\BroadcastReceiver\ContentProvider | |||||
| 支持传输数据类型 | 基本数据类型、List、Map、String、、Parcelable | |||||||
| 支持事件总线 | YES | |||||||
| 支持返回结果Callback | NO | YES | YES | |||||
| 数据到达率高低 | YES | YES | ||||||
| 数据最大长度 | 1024byte 管道流默认1024个字符 |
65536 | 同步调用为1MB-8KB<span class=”hint–top hint–error hint–medium hint–rounded hint–bounce” aria-label=”Cross Reference: /frameworks/native/libs/binder/ProcessState.cpp (androidxref.com) |
|||||
| “>[5] oneway调用为 (1MB-8kb) |
||||||||
| 数据传输速度 | ||||||||
| 数据拷贝次数 | 2次 客户端拷贝一次,服务端拷贝一次 |
1次,操作的都是Binder驱动的对象 | ||||||
| 优点 | 支持设置超时时间 | 适合服务端被多个客户端访问,适合多线程访问服务端的场景 | ||||||
| 缺点 | 客户端和服务端需要各自维护一个子线程监听数据传输 | 仅适合在不同App之间使用 发生异常不回返回调用者 必须使用Service,需要考虑兼容系统版本 |
不能传递复杂消息,只能用来同步 | |||||
| 本质 | IO流 | 传输层网络协议 |
- AIDL仅适合:不同App通过IPC访问服务、服务中需要多线程处理
- 不跨App,建议使用Binder执行并发IPC
- 不跨App,且不存在多线程并发,建议使用Messager
开源方案#
| 对比项 | Andromeda | Hermes\HermesEventBus | ModularizationArchitecture | CC | ActivityRouter |
|---|---|---|---|---|---|
| 参考wiki | 跨进程通信框架Andromeda解析架 | CC:业界首个支持渐进式组件化改造的Android组件化框架 | |||
| 开源时间 | 2018年1月 | 2016年6月 | 2017年1月 | 2017年11月 | |
| 支持双向 | YES | ||||
| 支持本进程通信 | YES | YES | YES | ||
| 支持启动者数量 | Fragment\Activity | ||||
| 支持事件总线 | YES | YES | |||
| 支持返回结果Callback | YES | NO | YES | ||
| 数据到达率高低 | |||||
| 数据最大长度 | |||||
| 数据传输速度 | |||||
| 数据拷贝次数 | |||||
| 缺点 | 不支持oneway、in、out、inout | 仅支持开发期间 | |||
| 本质 | AIDL | AIDL | AIDL | ||
| 开发者 | 爱奇艺 | 饿了么 |
原生方案#
Pipe#
文档地址#
相关API#
Pipe类open()、sink()、source();CountDownLatch类countDown()、await()ByteBuffer类allocate()、flip()、clear()、array()
Demo设计#

Demo代码#
Test.java#
1 | import java.io.IOException; |
Sender.java#
1 | import java.io.IOException; |
Receiver.java#
1 | import java.io.IOException; |
PipeReader、PipeWriter#
文档地址#
相关API#
PipedWriter类write()PipedReader类PipedWriter(PipedWriter)、read(buffer)、connect()CountDownLatch类countDown()、await()CharBuffer类allocate()、flip()、clear()、array()
Demo设计#

Demo代码#
Test.java#
1 | import java.io.IOException; |
Sender.java#
1 | import java.io.IOException; |
Receiver.java#
1 | import java.io.IOException; |
Socket#
文档地址#
相关API#
ServerSocket类:accept()Socket类:getInputStream()、getOutputStream()PrintStream类:println()BufferedReader类:readLine()System类:System.in- Collections
Demo设计#

Demo代码#
MySever.java#
1 | import java.io.IOException; |
ServerThread.java#
1 | import java.io.BufferedReader; |
MyClient.java#
1 | import java.io.BufferedReader; |
ClientThread.java#
1 | import java.io.BufferedReader; |
Binder#
文档地址#
Cross Reference: /frameworks/native/libs/binder/ (androidxref.com)
binder三层架构<span class=”hint–top hint–error hint–medium hint–rounded hint–bounce” aria-label=”Binder系列2—Binder Driver再探 - Gityuan博客 | 袁辉辉的技术博客#
“>[6]
从上至下应用层、IPC传输层、内核层
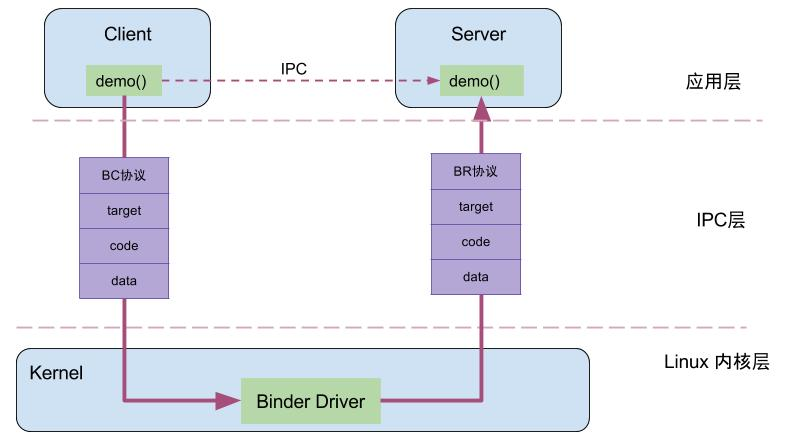
Binder通信架构#
通信模型分为客户端和服务端,通过读取Driver驱动的数据完成通信
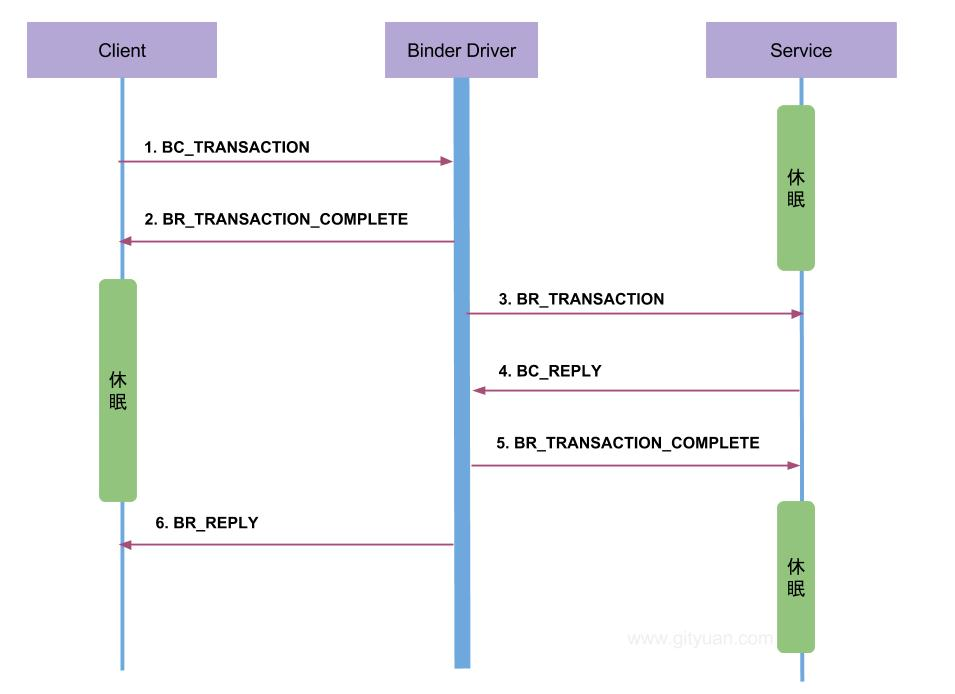
- 请求码:BC_开头,简称BC码,用于从IPC层传递到BinderDriver层
- 响应码:BR_开头,简称BR码,用于从BinderDriver层传递数据到IPC层
binder内存机制mmap#
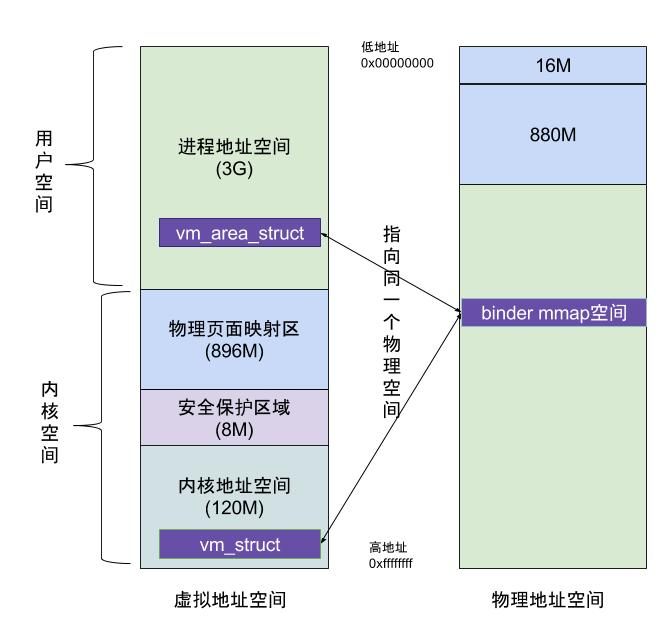
内存分为两个类型:虚拟地址和物理地址
- 虚拟地址分两个类型:用户空间和内核空间
- 虚拟地址是什么?
- 用户空间是什么?
- 内核空间是什么?
- 物理地址空间是指什么?存疑:CPU上具体的内存地址
用户空间上的某块地址vm_area_struct,内核空间上的vm_struct都会映射到同一块物理内存空间地址上。这一块物理内存叫mmap
这块mmap内存有什么特征?
- 客户端向服务端发送数据时,先从客户端所在的用户空间,把数据通过**
copy_from_user**拷贝到内核空间 - 服务端所在的用户空间与内核空间共享位于物理地址空间mmap空间处的同一份数据(该数据是位于mmap空间中,不代表等于mmp空间),服务端所在的用户空间读取该位置的数据时,不需要拷贝数据,而是直接得到物理地址空间的内存地址。
- 因此数据传输只发生一次拷贝,也就是客户端用户空间的数据拷贝至内核空间。
- 服务端进程直接读取物理地址空间的内存地址。
数据流向图如下:
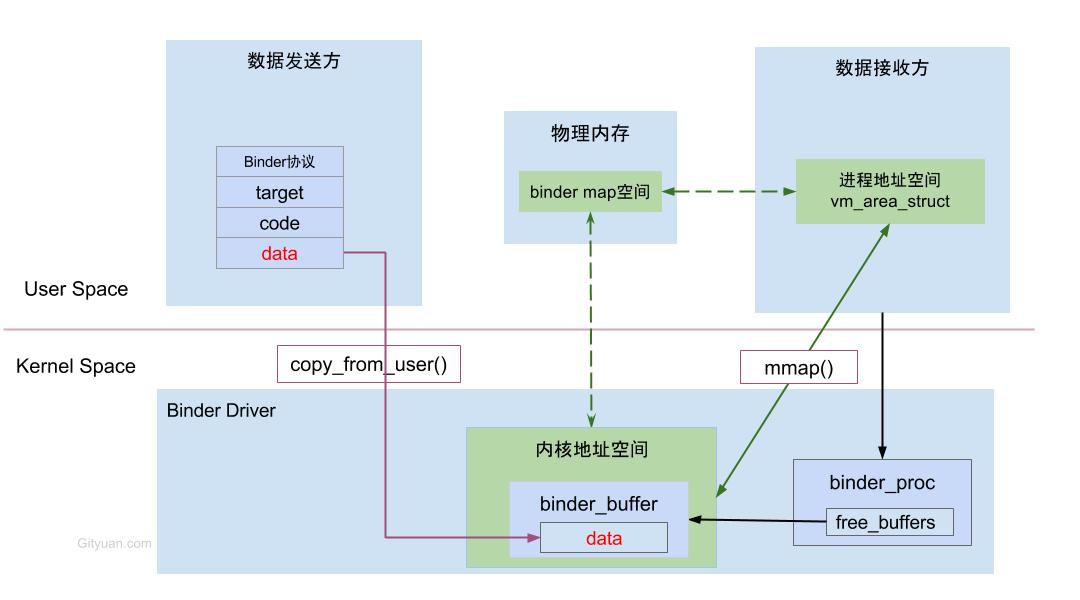
1。红色箭头,代表客户端地址空间将数据拷贝到内核地址空间
2.。绿色虚线箭头,是双向的,代表内核地址空间与物理地址空间是双向访问的,
3。绿色实现箭头,是双向的,代表服务端空间地址与内核空间地址是双向访问的,
4。2和3表明一个事实,服务端可以直接访问内核空间、物理空间的地址,而不需要创建一份拷贝
5。黑色箭头表明,服务端访问内核空间的地址时,需要将数据读取至缓存buffer中;写数据时,也需要将数据写至缓存buffer中
AIDL#
文档地址#
相关API#
Service类:onBind()IRemoteService类:setUser()、isLogin()、asInterface()IRemoteService.Stub类:setUser()、isLogin()、asInterface()SharedPreferences类:putString、commit、apply、SharedPreferences.EditorServiceConnection类:onServiceConnected()、onServiceDisconnected()Activity类:bindService()- AIDL语法:in out inout oneway
?>in out inout区别?
in 表示数据只能由客户端流向服务端
out 表示数据只能由服务端流向客户端
inout 则表示数据可在服务端与客户端之间双向流通。
其中,数据流向是针对在客户端中的那个传入方法的对象而言的。
in 为定向 tag 的话表现为服务端将会接收到一个那个对象的完整数据,但是客户端的那个对象不会因为服务端对传参的修改而发生变动;
out 的话表现为服务端将会接收到那个对象的参数为空的对象,但是在服务端对接收到的空对象有任何修改之后客户端将会同步变动;
inout 为定向 tag 的情况下,服务端将会接收到客户端传来对象的完整信息,并且客户端将会同步服务端对该对象的任何变动
in参数使得实参顺利传到服务方,但服务方对实参的任何改变,不会反应回调用方。
out参数使得实参不会真正传到服务方,只是传一个实参的初始值过去(这里实参只是作为返回值来使用的,这样除了return那里的返回值,还可以返回另外的东西),但服务方对实参的任何改变,在调用结束后会反应回调用方。
inout参数则是上面二者的结合,实参会顺利传到服务方,且服务方对实参的任何改变,在调用结束后会反应回调用方。
其实inout,都是相对于服务方。in参数使得实参传到了服务方,所以是in进入了服务方;out参数使得实参在调用结束后从服务方传回给调用方,所以是out从服务方出来。
Demo设计#


Demo代码-基本数据类型#
IRemoteService.aidl#
1.位于src\main\aidl\com\shaunsheep\aidlclient\IRemoteService.aidl下
2.build/rebuild的时候会生成Java版本的IRemoteService接口,输出结果位于build\generated\aidl_source_output_dir\debug\compileDebugAidl\out\com\shaunsheep\aidlclient\IRemoteService.java
1 | // IRemoteService.aidl |
服务端RemoteService.java#
1.提供一个内部类IRemoteService.Stub mBinder
2.让客户端App调用,会返回给客户端App这个mBinder对象,通过mBinder对象,客户端可以生成IRemoteService的实现类。有了这个实现类,客户端App就可以IPC通信,调用RemoteService下的mBinder方法,获取登录状态,设置登录信息
3.让服务端App调用onServiceConnected,可以获取到mBinder,进而可以IPC通信,调用mBinder的方法,获取登录状态、设置登录信息
1 | package com.shaunsheep.server; |
记得在服务端清单文件注册该服务
1 | <service |
服务端MainActivity#
1 | package com.shaunsheep.server; |
客户端MainActivity#
1.启动服务端App的Service,绑定ServiceConnection链接
2.从ServiceConnection中拿到服务端Service的内部类IBinder子类
3.通过IRemoteService.Stub.asInterface(ibinder)将ibinder子类转为IRemoteService实现类
4.在客户端App任何位置都可以通过操作IRemoteService实现类,来达到访问服务端App的效果
1 | package com.shaunsheep.aidlclient; |
Demo代码-自定义数据类型#
我们假设提供一个User对象,供客户端和服务端通信使用
它有如下步骤;
在服务端进行如下步骤:
- 在src/main/aidl目录下创建User.java,继承Parcelable接口,实现必要的方法
- 在src/main/aidl目录下创建User.aidl,声明User.java可以被引用
- 在src/main/aidl/IRemoteService里import 导入User,提供User的设置和访问接口
在客户端进行如下步骤:
- 在src/main/aidl目录下创建User.java,继承Parcelable接口,实现必要的方法
- 在src/main/aidl目录下创建User.aidl,声明User.java可以被引用
- 在src/main/aidl/IRemoteService里import 导入User,提供User的设置和访问接口
!>注意事项
1.客户端和服务端的aidl包名必须一致
2.传输自定义数据类型的时候,注意in、out、inout的使用
IRemoteService.java#
文件位置:
服务端app-server/src/main/aidl/com/shaunsheep/server/IRemoteService.aidl
客户端app/src/main/aidl/com/shaunsheep/server/IRemoteService.aidl
!>注意客户端和服务端包名、文件夹名皆需要一致
比前一个demo相比,多了setUserObject接口和getUser接口
1 | // IRemoteService.aidl |
User.aidl#
文件位置:
服务端app-server/src/main/aidl/com/shaunsheep/server/User.aidl
客户端app/src/main/aidl/com/shaunsheep/server/User.aidl
!>注意客户端和服务端包名、文件夹名皆需要一致
1 | // User.aidl |
User.java#
文件位置:
服务端app-server/src/main/aidl/com/shaunsheep/server/User.java
客户端app/src/main/aidl/com/shaunsheep/server/User.java
!>注意客户端和服务端包名、文件夹名皆需要一致
1 | package com.shaunsheep.server; |
服务端RemoteService.java#
比上一个demo相比,内部类mBinder多了俩对外暴露的接口setUserObject、getUser,需要实现一下,供客户端和服务端调用
1 | package com.shaunsheep.server; |
客户端MainActivity#
调用获取服务端的getUser接口数据,显示到UI上;设置User对象,传递给服务端
1 | public void getUser(View view) { |
服务端MainActivity#
新增俩UI控制接口getUser和setUserObject,一个是从服务端获取User对象,一个是设置User对象给服务端
1 | public void getUser(View view) { |
Demo代码-Bundle数据类型#
?>必现问题-ClassNotFoundException 自定义类型找不到
Caused by: android.os.BadParcelableException: ClassNotFoundException when unmarshalling: com.shaunsheep.server.User
解决办法,在获取bundle的所有位置,包括客户端和服务端,都加入类加载器[1]
IRemoteService.java#
文件位置:
服务端app-server/src/main/aidl/com/shaunsheep/server/IRemoteService.aidl
客户端app/src/main/aidl/com/shaunsheep/server/IRemoteService.aidl
!>注意客户端和服务端包名、文件夹名皆需要一致
比前一个demo相比,多了bundle操作接口setUserBundle和 getUserBundle
1 | // IRemoteService.aidl |
服务端RemoteService.java#
!>注意,一旦引入Bundle类,就需要为其设置类加载,set方法和get方法都需要设置:
bundle.setClassLoader(getClass().getClassLoader());
比上一个demo相比,内部类mBinder多了俩对外暴露的接口setUserBundle、getUserBundle,需要实现一下,供客户端和服务端调用
1 | package com.shaunsheep.server; |
服务端MainActivity#
新增俩UI控制接口getBundle、setBundle,一个是从Service中读取Bundle中的User对象,一个是设置Bundle里的User对象
1 | public void getBundle(View view) { |
客户端MainActivity#
!>注意,客户端读取Bundle中的User对象,务必加上类加载器的声明
undle.setClassLoader(getClass().getClassLoader());
其他代码跟服务端MainActivity代码很类似
1 | public void getBundle(View view) { |
AIDL的注意事项#
1.客户端和服务端的AIDL文件所在包包名必须相同[3]
2.自定义对象,在AIDL中引用,必须加import语句[1]
3.ADIL文件中函数参数有自定义对象,必须加in、out、inout数据流向关键字[1]
4.客户端与服务端的AIDL文件必须完全相同,一个关键字也不能有差异[2]
5.在实现自定义对象类的时候,变量序列化的顺序和反序列化的顺序必须完全一致
6.AIDL内不支持方法重载(存疑)
7.AIDL传输Bundle对象,必须在调用getBundle的位置指明类加载器[1]
AIDL常见问题#
1.in、out、inout有什么联系和区别
2.AIDL自定义对象的步骤,找不到该类如何解决?import
3.AIDL使用Bundle的步骤,找不到Bundle中的类如何解决?设置类加载器[1]
4.AIDL支持哪些数据类型
5.服务端挂掉,客户端能访问成功吗
6.客户端如何连接服务端?
7.客户端如何断开连接服务端?
8.序列化一个对象的步骤?
9.序列化的两种方式对比?
10.Bundle中为什么找不到自定义的User对象?-参考一个Integer找不到main方法错误体会双亲委派和类加载机制
11.oneway有什么用?异步
12.oneway异步会anr吗?
实战问题
假设有服务端A,客户端B、C、E…
1 | 接口1 Iplayer1.aidl |
13.多线程访问服务端的接口Iplayer1#start,1000个线程访问,start平均耗时2秒,有什么风险?[4]
14.多线访问服务端的异步oneway接口Iplayer1#start,1000个线程访问,start平均耗时2秒,有什么风险?[4]
15.多个客户端访问服务端的多个binder,如IPlayer1、IPlayer2
服务端处理binder调用,是单线程还是多线的?多个客户端访问服务端的binder服务,会怎么样?
客户端B、C、E..同时访问服务端Iplayer1#start接口,会同时执行吗?会咋样?
oneway的binder通信,服务端进程一次只有一个binder线程处理一个oneway的binder请求,其余请求会排队等待执行
16.多个客户端访问同一个binder驱动,如Iplayer1
- 同一时刻客户端B访问服务端A的IPlayer1#start,进程C访问服务端A的IPlayer2#start,服务端A能否同时响应两次Binder调用并执行?答:能
- 同一时刻客户端B访问服务端A的IPlayer1#start,客户端C访问服务端A的IPlayer1#stop,服务端A能否同时响应Iplayer1的两个不同方法调用?答:不能
线程通信方案#
全局变量
Handler
Semaphore
countDownLatch
管道
ThreadLocal
EventBus
#
问题集合#
Service Intent must be explicit: Intent#
- 使用隐式意图的话,加上包名信息即可;
1 | Intent intent = new Intent(); |
- 显示意图
1 | Intent intent = new Intent(com.yulore.test.AppService.class); |
- 1.Android 接口定义语言 (AIDL) | Android 开发者 | Android Developers (google.cn)
↩ - 2.(41条消息) Binder invocation to an incorrect interface 异常分析_wangqiubo2010的博客-CSDN博客
↩ - 3.(41条消息) java.lang.SecurityException: Binder invocation to an incorrect interface报错问题_若然的专栏-CSDN博客
↩ - 4.[023]你真的懂AIDL的oneway嘛? - 简书 (jianshu.com) ↩
- 5.Cross Reference: /frameworks/native/libs/binder/ProcessState.cpp (androidxref.com) ↩
- 6.Binder系列2—Binder Driver再探 - Gityuan博客 | 袁辉辉的技术博客 ↩