摘自本人16年的的博客《详解 Android 通信》
什么是通信?#
通信 ,顾名思义,指的就是信息的传递或者交换
看完本文能收获什么?#
按目录索引,你可以学习到
1. 组件间的通信,Activity,fragment,Service, Provider,Receiver
2. 进程间的通信,AIDL
3. 线程间的通信,Handler,AnsycTask,IntentService
4. 多个App间的通信
5. 使用大型开源框架完成组件通信,EventBus,otto
6. 网络通信基础篇:Google 课程–AnsycTask+HttpClient
7. 网络通信提高篇:开源框架Ansyc-Httpclient,okttp,Retrofit
建议阅读本文时遵循以下学习思路#
1. 研究对象:Activity,fragment等组件
2. 信息存在形式:Intent,Bundle,静态变量,全局变量,还是点击事件,触摸事件的回调监听,或者文件形式(Sharepreference,SQLite,File , NetStream) ,本质就是信息源
3. 信息传递的形式:网路,回调监听,线程,Intent,全局Application
4. 相同形式的思路,不会出现第二次,请读者举一反三
5. 最后强调研究对象是单一的
Activity通信#
Activity 和 Activity
1. 常规方式:Intent Bundle
通过Intent 启动另一个Activity时,有两种重载方式:
- startActivity(new Intent(),new Bundle());
- startActivityForResult(new Intent(),FLAG,new Bundle());
从参数列表就可以总结出来,有Intent,和Bundle,可以传递8种基本数据类型和可序列化的数据类型,比如字符串和字节数组。提到可序列化,就引发 Intent和Bundle 的局限性了:
- Intent Bundle 无法传递“不可序列化”的数据,比如Bitmap,InputStream,解决办法有很多种,最简单的就是将“不可序列化”的对象,转换成字节数组,这里因为主要是讲解通信,所以不展开讲了。
- Intent Bundle 能传递的数据大小在40K以内 。
PS : 很多人不理解为什么把Intent和Bundle放在一起谈,因为Intent 底层存储信息的原理也是通过Bundle存储!
2. 公有静态变量
比如 public static String flag=“中国”;
使用方式 比如 在其他Activity当中 FirstActivity.flag=“china”; 修改 静态变量的值
3. 基于物理形式:
比如 File,SQLite,Sharepreference 物理形式
4. 全局变量:
比如Application:Application是与Activity,Service齐名的组件,非常强大,它的特点是全局组件共用,单例形式存在,在其他组件中,我们只需要Context.getApplication()获得该对象的引用即可
Activity 和Fragment,Service,BrodcastReceiver
,首先都遵循,如何启动它们,就如何传递信息的原则:
1. Activity与Fragment
1. 通过构造函数传递 2.获取Fragment的实例对象
1 | //CustFragment 是自定义的fragment,参数列表也可以自己定义咯, |
聪明的读者可能会问Fragment如何与Activity通信类似的问题,这是个好问题,请注意我们的研究的原则是单一目标原则,在这节我研究的是Activity,你的疑惑在后面都会一一解答
2. Activity与Service
Activity启动Service的两种方式:
1 |
|
从启动方式就可以看出,通过Bundle对象的形式存储,通过Intent传输,来完成Activity向Service传递数据的操作
3. Activity与BroadcastReceiver
启动广播的形式也有两种:
1 | //method one !!!----------------------------------------------- |
关于method one 的第三个参数Handler很多人会很费解
参照registerReceiver中源码关于该Handler参数的解释:
Handler identifying the thread that will receive the Intent. If null, the main thread of the process will be used.
定义了一个用于接收Intent的子线程,如果不填或者默认为null,那么就会在主线程中完成接收Intent的操作
很明显,Activity与BroadcastReceiver通信时,用的也是Intent传递,Bundle存储
4. 通讯时的同步问题
这里的同步通讯问题,为下文Fragment通讯作铺垫,不是这个问题不重要,不值得引起你注意,只是我想把问题放在它最应该出现的位置。
以上只是基础的传递数据的形式,大部分都是静态的,现在有一种需求,用户操作Activity,发出了某些指令,比如按下,滑动,触摸等操作,如何完成这些信息传递呢?这就要求同步了。
同步传递消息也很简单,就是调用系统写好的回调接口
首先我们要知道,用户 点击,触摸 这些行为 也属于 通信的范畴—点击和触摸属于 信息源;
比如用户行为进行点击,那就实现 :
1 | new Button(mCotext).setOnClickListener(new View.OnClickListener() { |
通过此招提示指定的ImageView:嘿!老兄,你该刷新了
又或者 当用户 进行触摸操作,我们需要实现放大缩小平移指定的区域:
1 | new RelativeLayout(mCotext).setOnTouchListener(new View.OnTouchListener() { |
嘿,你看,当用户进行触摸操作,我们可以通过回调onTouchListenter来完成“触摸”这一操作
关于View重绘机制以及优化刷新UI的细节,不属于本文讨论范围。
Fragment#
1. Fragment 与Activity通信
通过实例对象传递
同样的,在Fragment中 getActivity()可以获取到它相关联的 Activity实例,就可以轻松获取并且修改Activity的数据
2. Fragment 与 多个Fragment通信
首先,两个Fragment之间不可能直接通信(非正规因素除外),Google官方提出的解决办法是 通过相关联的Activity来完成两个Fragment的通信
只需要记住三步:
1. 定义一个接口:
在让Fragment关联Activity之前,可以在Fragment中定义一个接口,然后让宿主Activity来实现这个接口。接着,在Fragment中捕获这个接口,并且在onAttach()中 捕获Activity实例
1 | //只需关注接口是如何定义的,以及onAttack中的实现 |
一旦Activity通过OnHeadlineSelectedListener 的实例mCallBack回调 onArticleSelected(),Fragment就可以传递信息 给Activity了
例如 下面是 ListFragment的一个回调方法,当用户点击了list 中的item,这个Fragment就会通过回调接口向宿主Activity传递事件
1 | @Override |
2. 在宿主Activity实现这个接口
怎么实现?很简单,参考下面代码:
1 | public static class MainActivity extends Activity |
3. 向其他Fragment传递信息 (完成通信)
宿主Activity可以通过findFragmentById()向指定的Fragment传递信息,宿主Activity可以直接获取Fragment实例,回调Fragment的公有方法
例如:
宿主Activity 包含了一个Listfragment用来展示条目信息,当每个条目被点击的时候,我们希望ListFragment向另外一个DetailsFragment传递一个信息用来 展示不同的细节
1 | public static class MainActivity extends Activity |
下面我写了一个实例来供大家理解:
各个类的联系图:
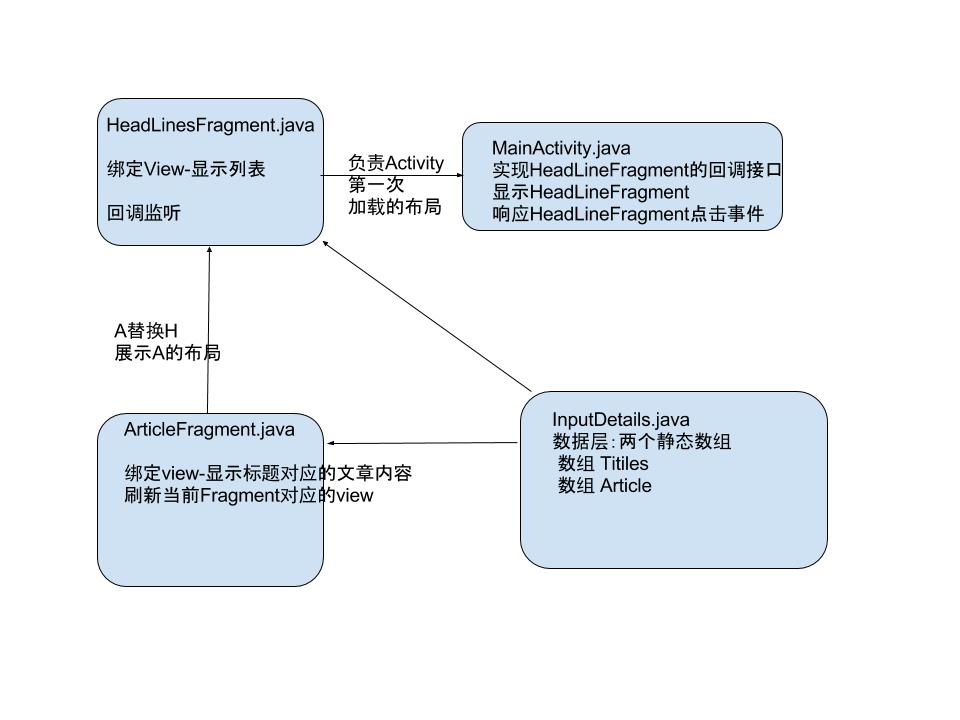
效果如下:
Service#
Service 与Activity通信
主要是如何获得Service实例的问题
总结来说两步:
- 在Service定义内部类,继承Binder,封装Service作为内部类的属性,并且在onBind方法中返回内部类的实例对象
- 在Activity中实现ServiceConnection ,获取到Binder对象,再通过Binder获取Service
1
2
3
4
5
6
7
8
9
10
11
12
13
14
15
16
17
18
19
20
21
22
23
24
25
26public class LocalService extends Service {
// 传递给客户端的Binder
private final IBinder mBinder = new LocalBinder();
//构造Random对象
private final Random mGenerator = new Random();
/**
* 这个类提供给客户端 ,因为Service总是运行在同一个进程中的
*/
public class LocalBinder extends Binder {
LocalService getService() {
// 当客户端回调的时候,返回LoacalService实例
return LocalService.this;
}
}
@Override
public IBinder onBind(Intent intent) {
return mBinder;
}
/**交给客户端回调的方法 */
public int getRandomNumber() {
return mGenerator.nextInt(100);
}
}
1 | public class BindingActivity extends Activity { |
除了这种回调的方式外
还有一种方式 是在Service中 发送广播,
比如 在Service中 开启了一个子线程执行任务,就在子线程的run()方法中去sendBroadcast(intent);
数据用Intent封装,传递形式用广播
AIDL完成进程间通信#
关于进程和线程的细节改天详细说明,我们首先了解一下进程和线程的概念:当某个应用组件启动且该应用没有运行其他任何组件时,Android 系统会使用单个执行线程为应用启动新的 Linux
进程。默认情况下,同一应用的所有组件在相同的进程和线程(称为“主”线程)中运行。
如果某个应用组件启动且该应用已存在进程(因为存在该应用的其他组件),则该组件会在此进程内启动并使用相同的执行线程。
但是,我们也可以安排应用中的其他组件在单独的进程中运行,并为任何进程创建额外的线程。各类组件元素的清单文件条目—:activity,servicer,eceiver 和 provider均支持 android:process 属性,此属性可以指定该组件应在哪个进程运行。我们可以设置此属性,使每个组件均在各自的进程中运行,或者使一些组件共享一个进程,而其他组件则不共享。 此外,我们还可以设置 android:process,使不同应用的组件在相同的进程中运行
以及了解一下 进程间通信的概念
Android 利用远程过程调用 (RPC) 提供了一种进程间通信 (IPC) 机制,通过这种机制,由 Activity
或其他应用组件调用的方法将(在其他进程中)远程执行,而所有结果将返回给调用方。这就要求把方法调用及其数据分解至操作系统可以识别的程度,并将其从本地进程和地址空间传输至远程进程和地址空间,然后在远程进程中重新组装并执行该调用。
然后,返回值将沿相反方向传输回来。 Android 提供了执行这些 IPC 事务所需的全部代码,因此我们只需集中精力定义和实现 RPC
编程接口即可。要执行 IPC,必须使用 bindService() 将应用绑定到服务上。
具体实现 可以 参考这个实例 和文末给出的官方文档
线程间通信#
Handler 和AsyncTask都是用来完成子线程和主线程即UI线程通信的
都可以解决主线程 处理耗时操作,造成界面卡顿或者程序无响应ANR异常 这一类问题
Handler 是 一种机制【Handler+Message+Looper】,所有的数据通过Message携带,,所有的执行顺序按照队列的形式执行,Looper用来轮询判断消息队列,Handler用来接收和发送Message
AsyncTask 是一个单独的类,设计之初的目的只是为了 异步方式完成耗时操作的,顺便可以通知主线程刷新Ui,AsyncTask的内部机制则是维护了一个线程池,提升性能。
在这里提供另一种优雅的做法完成线程间的通信:
扩展 IntentService 类
由于大多数启动服务都不必同时处理多个请求(实际上,这种多线程情况可能很危险),因此使用 IntentService 类实现服务值得一试。
但如需同时处理多个启动请求,则更适合使用该基类Service。
IntentService 执行以下操作:
- 创建默认的工作线程,用于在应用的主线程外执行传递给 onStartCommand() 的所有 Intent。
- 创建工作队列,用于将一个 Intent 逐一传递给 onHandleIntent() 实现,这样我们就永远不必担心多线程问题。
- 在处理完所有启动请求后停止服务,因此我们不必调用 stopSelf()。
- 提供 onBind() 的默认实现(返回 null)。
- 提供 onStartCommand() 的默认实现,可将 Intent 依次发送到工作队列和 onHandleIntent() 实现。
综上所述,您只需实现 onHandleIntent() 来完成客户端提供的工作即可。(不过,我们还需要为服务提供小型构造函数。)
以下是 IntentService 的实现示例:
1 | public class HelloIntentService extends IntentService { |
看吧,我们只需要一个构造函数和一个 onHandleIntent() 实现即可。
对于Service 当然也有基础一点的做法,来完成多线程的操作,只不过代码量更多了:
1 | public class HelloService extends Service { |
多个App间的通信#
首先我们要知道以下两点:
Android 应用一般具有若干个Activity。每个Activity显示一个用户界面,用户可通过该界面执行特定任务(比如,查看地图或拍照)。要将用户从一个Activity转至另一Activity,应用必须使用 Intent 定义做某事的“意向”。 当我们使用诸如 startActivity() 的方法将 Intent 传递至系统时,系统会使用 Intent 识别和启动相应的应用组件。使用意向甚至可以让我们的应用开始另一个应用中包含的Activity。
Intent 可以为 显式 以便启动特定组件(特定的 Activity 实例)或隐式 以便启动处理意向操作(比如“拍摄照片”)的任何组件。
1.向另一个应用发送用户
Android最重要的功能之一,是可以操作其他应用,比如在我们的应用中,需要使用地图显示公司地址,我们无序在地图应用程序中构建Activity,而是直接创建Intent查看 地址的请求,Android系统之后启动 可以在地图上显示 地址的应用。
1) 构建隐式的意图
隐式意图不用声明要启动的组件类名称,而是声明操作,比如查看,编辑,发送,或者获取某项。
如果您我们的数据是Uri,可以这样构建Intent:
1 | //当我们的应用通过startActivity()调用此Intent时,电话应用会发起向指定电话号码呼叫 |
这里还有一些其他Intent的操作和Uri数据对:
查看地图:
1
2
3
4
5// 基于地址的地图位置
Uri location = Uri.parse("geo:0,0?q=1600+Amphitheatre+Parkway,+Mountain+View,+California");
// 基于经纬度的地图位置
// Uri location = Uri.parse("geo:37.422219,-122.08364?z=14"); // z param is zoom level
Intent mapIntent = new Intent(Intent.ACTION_VIEW, location);查看网页:
1 | Uri webpage = Uri.parse("http://www.android.com"); |
有的同学会问了,我从哪里可以知道,Intent可以传递的 Uri的类型,或者其他数据类型呢?
答:可以查阅Google Intent的Api
2) 确认是否存在 接收意向的应用
注意:如果调用了意向,但设备上没有可用于处理意向的应用,我们的应用将崩溃。
要确认是否存在可响应意向的可用Activity,请调用 queryIntentActivities() 来获取能够处理ntent 的Activity列表。 如果返回的 List 不为空,则可以安全地使用该意向。例如:
1 | PackageManager packageManager = getPackageManager(); |
如果 isIntentSafe 是 true,则至少有一个应用将响应该意向。 如果它是 false,则没有任何应用处理该意向。
3) 启动指定Activity
当我指定意图后,通过startActivity(intent);就可以启动指定Activity
此处有一个Google官方的示例:
1 | // 构建Intent |
4) 显示应用选择器
比如我们要完成”分享操作“,用户可以使用多个App完成分享,我们应明确显示 选择器对话框,如图这里写链接内容
要显示选择器,需要使用Intent的createChooser()方法 创建Intent,并将其传递至startActivity()
1 | Intent intent = new Intent(Intent.ACTION_SEND); |
这将显示一个对话框,其中有响应传递给 createChooser() 方法的意向的应用列表,并且将提供的文本用作 对话框标题
2. 接收其他Activity返回的结果
通过Intent.startActivityForResult()来完成。
首先在启动另一个Activity时,我们需要指定request code以便返回结果时,我们可以正常处理它。
1 | static final int PICK_CONTACT_REQUEST = 1; // The request code |
当用户完成操作后,返回数据,系统会调用Activity的 onActivityResult()方法,
1 | @Override |
为了成功处理结果,我们必须了解Intent的格式,比如联系人返回的是带内容的URI,照相机返回的是Bitmap
如何根据返回的URI来读取数据,我们需要对ContentResolver 和 ContentProvider 有了解
下面就是一个三者结合的获取联系人的实例:
1 | @Override |
3. 接收其他Activity返回的结果
要允许其他应用开始您的Activity,需要
例如,此处有一个在数据类型为文本或图像时处理 ACTION_SEND 意向的意向过滤器:
1 | <activity android:name="ShareActivity"> |
定义与Intent关联的数据,只需通过 android:mimeType 指定我们接收的数据类型,比如text/plain 或 image/jpeg。
4. 处理Activity中的Intent
当Activity开始时,调用getIntent检索开始Activity的Intent,
1 | @Override |
5. 向指定Activity中返回数据
只需调用setResult指定结果代码和Intent
1 | Intent result = new Intent("com.example.RESULT_ACTION", Uri.parse("content://result_uri"); |
记住必须为结果指定结果码,通常为 RESULT_OK 或 RESULT_CANCELED。
我们也可以在Intent中 用Bundle存储额外的信息
细心的同学可能发现一个问题:
启动Activity 有startActivity() 和startActivityForResult() 两种启动方式,返回结果的形式id偶有setResult()吗?
如果开启当前Activity的Intent可能需要结果,只需调用 setResult()。 如果原始Activity已调用 startActivityForResult(),则系统将向其传递您提供给 setResult() 的结果;否则,会忽略结果。
使用大型开源框架完成组件间的通信#
Github上非常火的两大通信组件EventBus和otto:
## 1. EventBus
EventBus 是一个 Android 事件发布/订阅框架,通过解耦发布者和订阅者简化 Android 事件传递,这里的事件可以理解为消息,本文中统一称为事件。事件传递既可用于 Android 四大组件间通讯,也可以用户异步线程和主线程间通讯等等。
传统的事件传递方式包括:Handler、BroadCastReceiver、Interface 回调,相比之下 EventBus 的优点是代码简洁,使用简单,并将事件发布和订阅充分解耦。
1)概念:
事件(Event):又可称为消息,本文中统一用事件表示。其实就是一个对象,可以是网络请求返回的字符串,也可以是某个开关状态等等。事件类型(EventType)指事件所属的 Class。
事件分为一般事件和 Sticky 事件,相对于一般事件,Sticky 事件不同之处在于,当事件发布后,再有订阅者开始订阅该类型事件,依然能收到该类型事件最近一个 Sticky 事件。
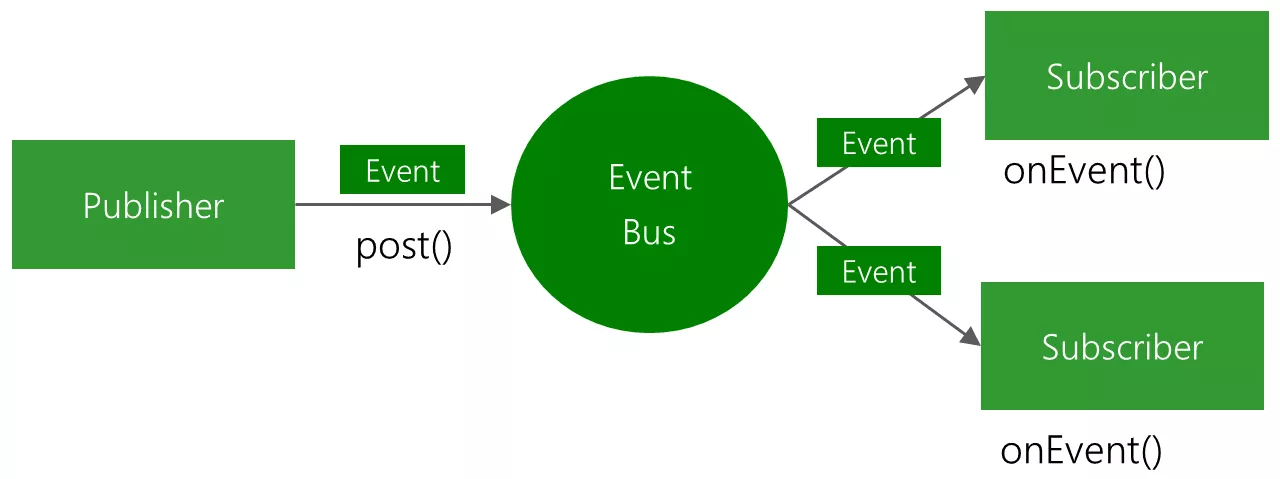
订阅者(Subscriber):订阅某种事件类型的对象。当有发布者发布这类事件后,EventBus 会执行订阅者的 onEvent 函数,这个函数叫事件响应函数。订阅者通过 register 接口订阅某个事件类型,unregister 接口退订。订阅者存在优先级,优先级高的订阅者可以取消事件继续向优先级低的订阅者分发,默认所有订阅者优先级都为 0。
发布者(Publisher):发布某事件的对象,通过 post 接口发布事件。
本项目较为简单,总体设计和流程图:
2)使用方式:
- build.gradle 中加入依赖
1
compile 'org.greenrobot:eventbus:3.0.0'
- 代码中指需三步
1. 定义事件:只需要是一个Java类
1 | public class MessageEvent { |
2. 完成订阅者
1 | //MessageEvent被Eventbus post提交的时候 将会回调这个方法 |
在Activity或者Fragment中绑定订阅者
1 | @Override |
3. 发布事件:
```
EventBus.getDefault().post(new MessageEvent("Hello everyone!"));
```
很遗憾未完成的部分#
- Binder 机制以及应用
- 网络通信基础篇:Google 课程–AnsycTask+HttpClient
- 网络通信提高篇:开源框架Ansyc-Httpclient,okttp,Retrofit